# Vue.js Workflow - Creating custom components, form fields and blocks in Twill
Objectives:
- Get an overview of Twill's Artisan commands for development
- Create a custom Vue.js component
- Create a custom Twill form field
- Create a custom Twill block
# Part 1 - Setup Twill for development
If you have been working with Twill for some time, you may already be familiar with the php artisan twill:update command. This command takes Twill's precompiled assets (JS, CSS, etc.) and copies them to your project's public/assets/admin folder.
To develop custom Vue.js components for Twill, we can forget about twill:update and take control of the build step with the following commands:
twill:build-> Build Twill assets with custom Vue components/blockstwill:dev-> Hot reload Twill assets with custom Vue components/blocks
We'll start by creating a simple HelloWorld component and building it with twill:build.
You will need a module in your project to follow along. We'll use pages as an example in this text.
# Create a custom component
Create the following file in your project:
resources/assets/js/components/HelloWorld.vue
<template>
    <!-- eslint-disable -->
    <div>
        Hello {{ name }}
    </div>
</template>

<script>
/* eslint-disable */

export default {
    props: ['name']
}
</script>
Why eslint-disable? Twill's own build tools come with a pretty strict ESLint configuration out of the box. This ensures a good internal consistency in the code of Twill's own components, but will give you an error if your components don't follow Twill's formatting rules.
The eslint-disable comments allow you to bypass the formatting rules for your own components. Try it for yourself, turn it on/off and see what you like!
# Build the new component
Run:
php artisan twill:build
This will start by installing Twill's NPM dependencies in vendor/area17/twill/node_modules. This is only required for the first run, you can skip the install step for your next builds with the --noInstall option:
php artisan twill:build --noInstall
This is only for Twill's own dependencies, you don't need to modify what is being installed in there. For your own dependencies in your custom components, you can run npm install directly into your project.
# Use the new component
When the build is done, you can use the new component in your forms:
// file: resources/views/admin/pages/form.blade.php


@extends('twill::layouts.form')

@section('contentFields')
    <a17-hello-world name="World"></a17-hello-world>
@stop
In your markup, all custom components must have the a17- prefix. In my personal opinion, it's also best to use an additional prefix for your components, such as a17-custom-. This will avoid all possible conflicts with Twill's built-in components, which also share the a17- prefix.
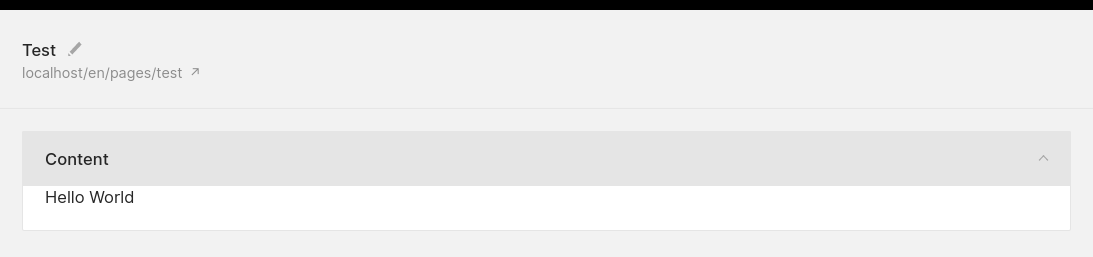
The component in action:
# Introducing twill:dev
When developing components, you can take advantage of twill:dev for fast rebuilds,
hot reloading and auto refresh in the browser:
php artisan twill:dev --noInstall
This will watch for changes in your resources/assets/js directory and rebuild accordingly.
Note for Sail/Docker users you may get the following error when running twill:dev:
Error: $SHELL environment variable is not set.
In this case, you can prefix the twill:dev command like this:
export SHELL=/usr/bin/bash && php artisan twill:dev --noInstall
# Twill dev mode
After running twill:dev, you need to inform Twill that you are in development
mode by setting the following variables in your .env file:
TWILL_DEV_MODE=true
TWILL_DEV_MODE_URL="http://localhost:8080"
TWILL_DEV_MODE_URL is used by Twill to access the development assets through the hot reloading server. You don't need to access this address in your browser, simply access your development site as before (e.g. http://my-app.test)
For Valet users the above configuration should work out of the box.
For Homestead/Vagrant users if you are running twill:dev inside of the VM, make sure to set TWILL_DEV_MODE_URL to your actual development URL (e.g. TWILL_DEV_MODE_URL="http://my-app.test:8080")
For Sail/Docker users if you are running twill:dev inside of the container, make sure to expose the 8080 port in your docker-compose.yml or Dockerfile configuration.
# Part 2 - Custom component practical example
The HelloWorld component is obviously not very useful. Custom components can be used to add interactivity to your Twill admin forms. Here's a more complete example of a CustomTabs component to organize your form fields in tabs:
This reuses a bit of CSS from other parts of Twill (ie. .box__filter).
# Vue.js component
resources/assets/js/components/CustomTabs.vue
<template>
    <!-- eslint-disable -->
    <div class="custom-tabs">
        <ul class="box__filter">
            <li v-for="tab of tabs">
                <a
                    href="#"
                    :class="{ 's--on': activeTab === tab.name }"
                    @click.prevent="activateTab(tab.name)"
                >
                    {{ tab.label }}
                </a>
            </li>
        </ul>
        <slot></slot>
    </div>
</template>

<script>
/* eslint-disable */

export default {
    props: {
        tabs: { type: Array },
    },

    data() {
        return {
            activeTab: null
        }
    },

    mounted() {
        if (this.tabs.length > 0) {
            this.activateTab(this.tabs[0].name)
        }
    },

    methods: {
        activateTab(name) {
            this.$el.querySelectorAll('.custom-tab').forEach(tab => {
                tab.classList.remove('is-active')
            });

            const newActiveTab = this.$el.querySelector(`.custom-tab--${name}`)

            if (newActiveTab) {
                newActiveTab.classList.add('is-active')
                this.activeTab = name
            }
        }
    },
}
</script>

<style scoped>
.custom-tabs {
    margin-top: 7px;
}

.custom-tab {
    display: none;
}

.custom-tab.is-active {
    display: initial;
}
</style>
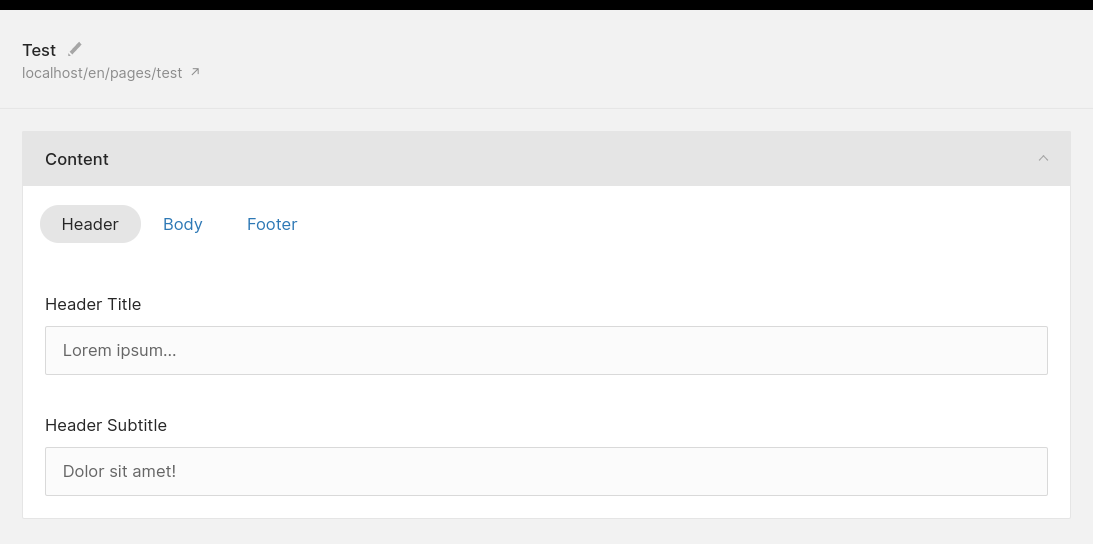
# Usage in a form
resources/views/admin/pages/form.blade.php
@extends('twill::layouts.form')

@section('contentFields')
    <a17-custom-tabs :tabs="[
        { name: 'header', label: 'Header' },
        { name: 'body', label: 'Body' },
        { name: 'footer', label: 'Footer' },
    ]">
        <div class="custom-tab custom-tab--header">
            @formField('input', [
                'name' => 'header_title',
                'label' => 'Header Title',
                'translated' => true,
            ])

            @formField('input', [
                'name' => 'header_subtitle',
                'label' => 'Header Subtitle',
                'translated' => true,
            ])
        </div>

        <div class="custom-tab custom-tab--body">
            <p>** Add body form fields here **</p>
        </div>

        <div class="custom-tab custom-tab--footer">
            <p>** Add footer form fields here **</p>
        </div>
    </a17-custom-tabs>
@stop
# Part 3 - Custom form field example
Form fields are at the core of the content management experience in any CMS. In Twill, form fields are usually made of 2 parts: a Vue.js component that hooks into Twill's Vuex store, and a Blade view that acts as an interface to this component.
Here's a complete example of a custom_number form field, based on the vue-numeric (opens new window) package:
# Install the dependency
npm install vue-numeric --save
# Vue.js component
resources/assets/js/components/CustomNumber.vue
<template>
    <!-- eslint-disable -->
    <a17-inputframe
        :error="error"
        :note="note"
        :label="label"
        :name="name"
        :required="required"
    >
        <div class="form__field">
            <vue-numeric
                :precision="precision"
                :currency="currency"
                :decimal-separator="decimalSeparator"
                :thousand-separator="thousandSeparator"
                :name="name"
                v-model="value"
                @blur="onBlur"
            ></vue-numeric>
        </div>
    </a17-inputframe>
</template>

<script>
/* eslint-disable */

import InputMixin from '@/mixins/input'
import FormStoreMixin from '@/mixins/formStore'
import InputframeMixin from '@/mixins/inputFrame'

import VueNumeric from 'vue-numeric'

export default {
    mixins: [InputMixin, InputframeMixin, FormStoreMixin],

    components: { VueNumeric },

    props: {
        name: {
            type: String,
            required: true,
        },
        initialValue: {
            type: Number,
            default: 0,
        },
        precision: {
            type: Number,
            default: 2,
        },
        currency: {
            type: String,
            default: '$',
        },
        decimalSeparator: {
            type: String,
            default: '.',
        },
        thousandSeparator: {
            type: String,
            default: '',
        },
    },

    data() {
        return {
            value: this.initialValue,
        }
    },

    methods: {
        updateFromStore(newValue) {
            if (typeof newValue === 'undefined') newValue = ''

            if (this.value !== newValue) {
                this.value = newValue
            }
        },
        updateValue(newValue) {
            if (this.value !== newValue) {
                this.value = newValue

                this.saveIntoStore()
            }
        },
        onBlur(event) {
            const newValue = event.target.value
            this.updateValue(newValue)
        },
    },
}
</script>

<style lang="scss" scoped>
.form__field {
    display: flex;
    align-items: center;
    padding: 0 15px;
    overflow: visible;

    input {
        @include resetfield;
        width: 100%;
        height: 43px;
        line-height: 43px;
        color: inherit;
        padding: 0;
    }
}
</style>
# Blade view
resources/views/admin/partials/form/_custom_number.blade.php
@php
    $precision = $precision ?? '2';
    $currency = $currency ?? '$';
    $decimalSeparator = $decimalSeparator ?? '.';
    $thousandSeparator = $thousandSeparator ?? '';
@endphp

<a17-custom-number
    label="{{ $label }}"
    :precision="{{ $precision }}"
    currency="{{ $currency }}"
    decimal-separator="{{ $decimalSeparator }}"
    thousand-separator="{{ $thousandSeparator }}"
    @include('twill::partials.form.utils._field_name')
    in-store="value"
></a17-custom-number>

@unless($renderForBlocks || $renderForModal || (!isset($item->$name) && null == $formFieldsValue = getFormFieldsValue($form_fields, $name)))
@push('vuexStore')
    window['{{ config('twill.js_namespace') }}'].STORE.form.fields.push({
        name: '{{ $name }}',
        value: {!! json_encode($item->$name ?? $formFieldsValue) !!}
    })
@endpush
@endunless
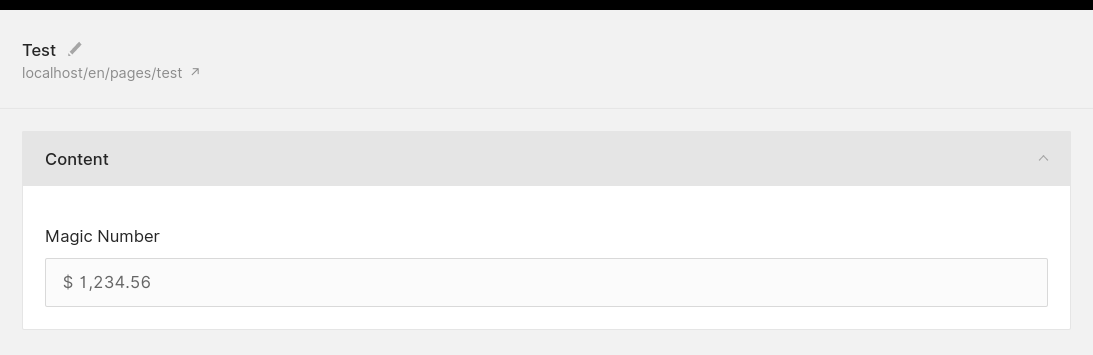
# Usage in a form
resources/views/admin/pages/form.blade.php
@extends('twill::layouts.form')

@section('contentFields')
    @formField('custom_number', [
        'name' => 'magic_number',
        'label' => 'Magic Number',
        'thousandSeparator' => ',',
    ])
@stop
# Digging deeper
This form field is functional but very limited, on purpose. For example, it is not translatable. At this time, the best way to explore what's possible with form fields is to dig into Twill's built-in form components.
Here are a few good places to start exploring:
- HiddenField.vue (opens new window) Possibly the simplest form field in Twill.
- DatePicker.vue (opens new window) A good example of form field that integrates with an external JS library.
- TextField.vue (opens new window) A complex form field with translations and type variations.
# Part 4 - Custom block example
The first thing to say about custom Vue.js blocks is that you probably don't need them! Since Twill 2.0, custom blocks can be created entirely with Blade views. The twill:make:block command can scaffold a Blade block for you:
php artisan twill:make:block banner
This will create the following file in your project:
resources/views/admin/blocks/banner.blade.php
@twillBlockTitle('Banner')
@twillBlockIcon('text')
@twillBlockGroup('app')

@formField('input', [
    'name' => 'title',
    'label' => 'Title',
])

// ...
You can add all of Twill's built-in form fields in your blocks, as well as any custom components and form fields that you create. This is the reason why creating custom Vue.js blocks may not be necessary.
Here's an example of our custom_number field inside of a custom Blade block:
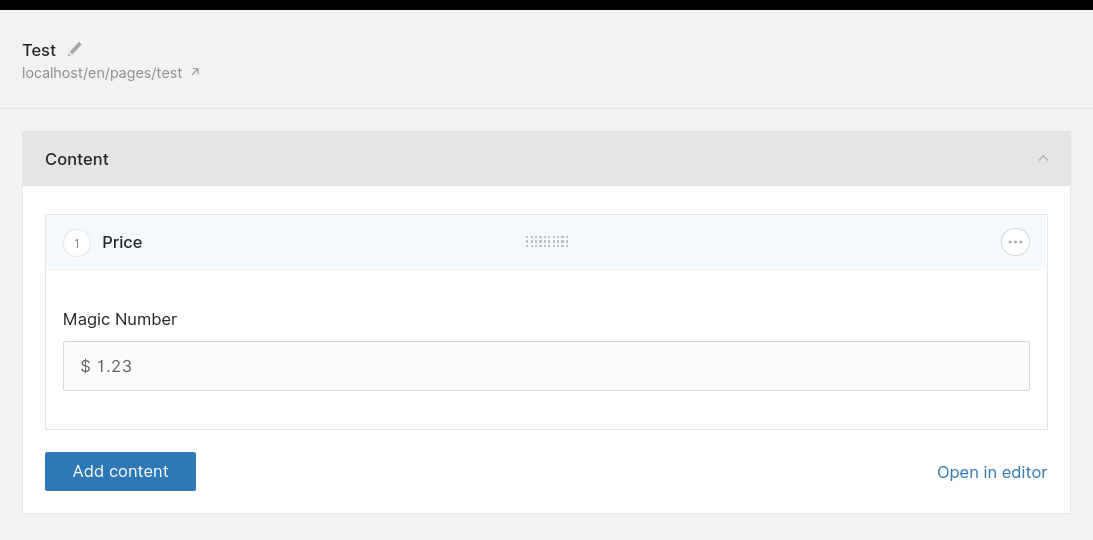
resources/views/admin/blocks/price.blade.php
@twillBlockTitle('Price')
@twillBlockIcon('text')
@twillBlockGroup('app')

@formField('custom_number', [
    'name' => 'magic_number',
    'label' => 'Magic Number',
    'thousandSeparator' => ',',
])
Nevertheless, if you wish to explore custom Vue.js blocks, you can use the twill:blocks command to get going.
# Prepare your custom block
Add the @twillBlockCompiled directive to your Blade view:
resources/views/admin/blocks/banner.blade.php
@twillBlockTitle('Banner')
@twillBlockIcon('text')
@twillBlockGroup('app')
@twillBlockCompiled('true')

// ...
Then run :
php artisan twill:blocks
This will create the following file in your project:
resources/assets/js/blocks/BlockBanner.vue
<template>
  <!-- eslint-disable -->
  <div class="block__body">
    <a17-locale type="a17-textfield" :attributes="{ label: 'Title', name: fieldName('title'), type: 'text', inStore: 'value' }" ></a17-locale>
  </div>
</template>

<script>
import BlockMixin from '@/mixins/block'

export default {
  mixins: [BlockMixin]
}
</script>
This file is effectively your Blade template, rendered into a Vue.js component shell. How cool is that?
# Customize and build
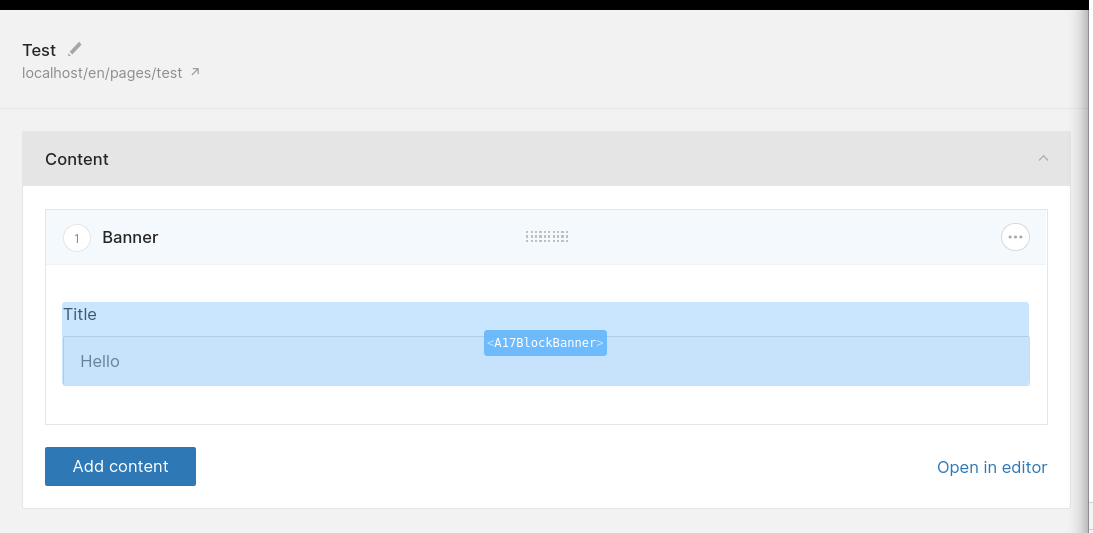
From this point, you can customize the new Vue.js component in any way you want. Keep in mind that your custom block is limited to the following area in the Block Editor (shown in blue):
When you are done, run:
php artisan twill:build --noInstall
Then the custom block is usable in the block editor:
resources/views/admin/pages/form.blade.php
@extends('twill::layouts.form')

@section('contentFields')
	// ...

    @formField('block_editor', [
        'blocks' => ['banner'],
    ])
@stop