Creating a block
Now that we have a block editor on the page module. We can start creating some custom blocks.
By default, Twill provides 2 basic blocks:
- There is a image block
- And a wysiwyg block
It is up to you to decide if you want to keep these enabled or disable them. For this guide we will disable them and create our own custom blocks:
- A title and text block
- A basic image block
Disable default blocks
To disable the default blocks, we have to remove them from the configuration.
Open up config/twill.php and add a block_editor key like this:
1<?php2 3return [4 'block_editor' => [5 'use_twill_blocks' => [],6 ]7]If you now go back to the block editor and try to add a block you will see that there is nothing available. That's great now we can go and create our own!
Creating a title and text block
A basic block is just a single blade file in the resources/views/twill/block directory. It does have some annotations
at the top that helps Twill understand your block a bit better.
To create a block, we can use the artisan command php artisan twill:make:block followed by the name of the block.
Let's make a block that has a title and body. We will call it text.
php artisan twill:make:block text
It will ask us Should we also generate a view file for rendering the block?, as this will make it easier usually you
will want to answer yes.
Now that the block has been created, open up resources/views/twill/blocks/text.blade.php and it should look like this:
1@twillBlockTitle('Text') 2@twillBlockIcon('text') 3@twillBlockGroup('app') 4 5<x-twill::input 6 name="title" 7 label="Title" 8 :translated="true" 9/>10 11<x-twill::wysiwyg12 name="text"13 label="Text"14 placeholder="Text"15 :toolbar-options="[16 'bold',17 'italic',18 ['list' => 'bullet'],19 ['list' => 'ordered'],20 [ 'script' => 'super' ],21 [ 'script' => 'sub' ],22 'link',23 'clean'24 ]"25 :translated="true"26/>The default stubs for blocks that Twill provides, already have a title and wysiwyg field. Pretty convenient!
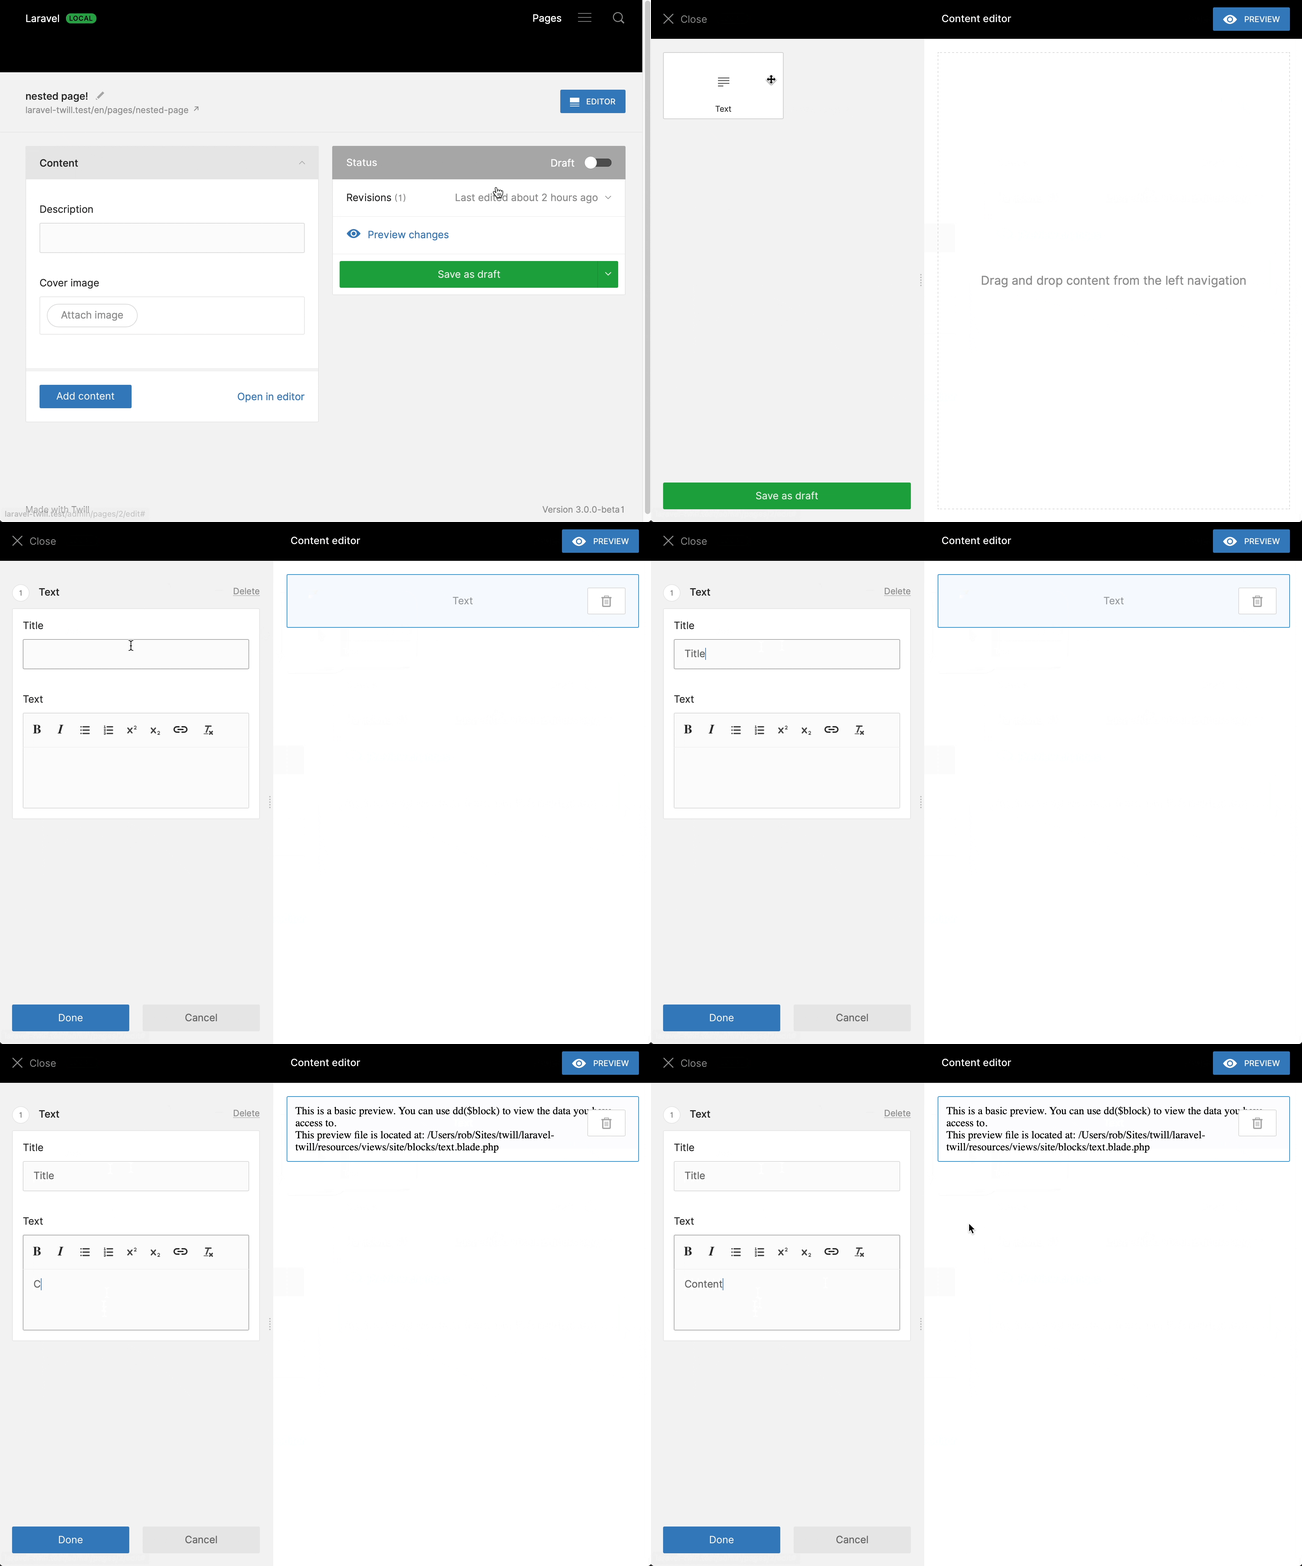
You can modify this if you wish, but out of the box this does exactly what we want it to do. Now let's go back to the browser and add a block to our page.

As you may have noticed, the preview does not show our content yet. That's normal because we have not added anything yet in the preview file.
We can open the file from the message and make it print our content.
In resources/views/site/blocks/text.blade.php we can add the following:
1<div class="prose">2 <h2>{{$block->translatedInput('title')}}</h2>3 {!! $block->translatedInput('text') !!}4</div>As you can see we use translatedInput, this makes sure that the content shown is in the current Laravel locale. If a
field is not translatable you should use input instead.
Now when you add the block and write some content, you will see that the title and text appear!
Let's make another block now for the image.
Creating a basic image block
We will basically do the same as before, however, this time we will have to update the block form as we do not enter text but we attach a media field instead.
php artisan twill:make:block image
And again we answer yes to the preview. But this time, we update the block to have the following:
1@twillBlockTitle('Image')2@twillBlockIcon('text')3@twillBlockGroup('app')4 5<x-twill::medias6 name="highlight"7 label="Highlight"8/>And if you remember from earlier in the guide, if we add a media field, we have to make sure that there is a role/crop configuration for it!
We also mentioned before that for blocks, we do need a slightly different configuration. Let's add a block image role
to config/twill.php:
1<?php 2 3return [ 4 'block_editor' => [ 5 'use_twill_blocks' => [], 6 'crops' => [ 7 'highlight' => [ 8 'desktop' => [ 9 [10 'name' => 'desktop',11 'ratio' => 16 / 9,12 ],13 ],14 'mobile' => [15 [16 'name' => 'mobile',17 'ratio' => 1,18 ],19 ],20 ],21 ],22 ],23];Now with this in place, you can go back to the block editor and add your first image block! But just as before, we have
to update the content of the preview file (resources/views/site/blocks/image.blade.php) so that we actually display
the image!
1<div class="py-8 mx-auto max-w-2xl flex items-center">2 <img src="{{$block->image('highlight', 'desktop')}}"/>3</div>Great! That should give you plenty of flexibility to play around and create more blocks.